
Pastels
There are two different kinds of pastel
Oil pastel: These usually have quite strong vivid colours and a waxy feel to them. In order to mix them on the paper you need a solvent to break down the binding agent
Soft pastels: These can be in stick form, as pencils or in tiny plastic containers known as pan pastels
This review is all about soft pastels in stick form
The materials I recommend are highlighted in green
I think pastels are probably the most forgiving of all painting mediums. They are not new, in fact they go back hundreds of years. They give you the ability to change your work in many ways as you progress through your painting. You can remove pastel, put light over dark as well as dark over light. Provided your pastels are of good quality, they will not fade or deteriorate in any way once protected by a frame and glass.
People often ask if pastels are the same as chalk. The answer is no. Chalk is made of limestone or gypsum and compressed into powdered sticks with some type of colouring. Pastels are made from pure mineral pigments and usually combined with gum tragacanth or gum arabic and water to hold them together. Good quality pastels will have little or no ‘fillers’ in the product, hence the rich crystal like sparkle they show when spread onto paper. Cheaper pastels will have artificial colouring and little in the way of pure minerals. They will have more bulking and filling agents; therefore they will give a rather matt dull appearance.
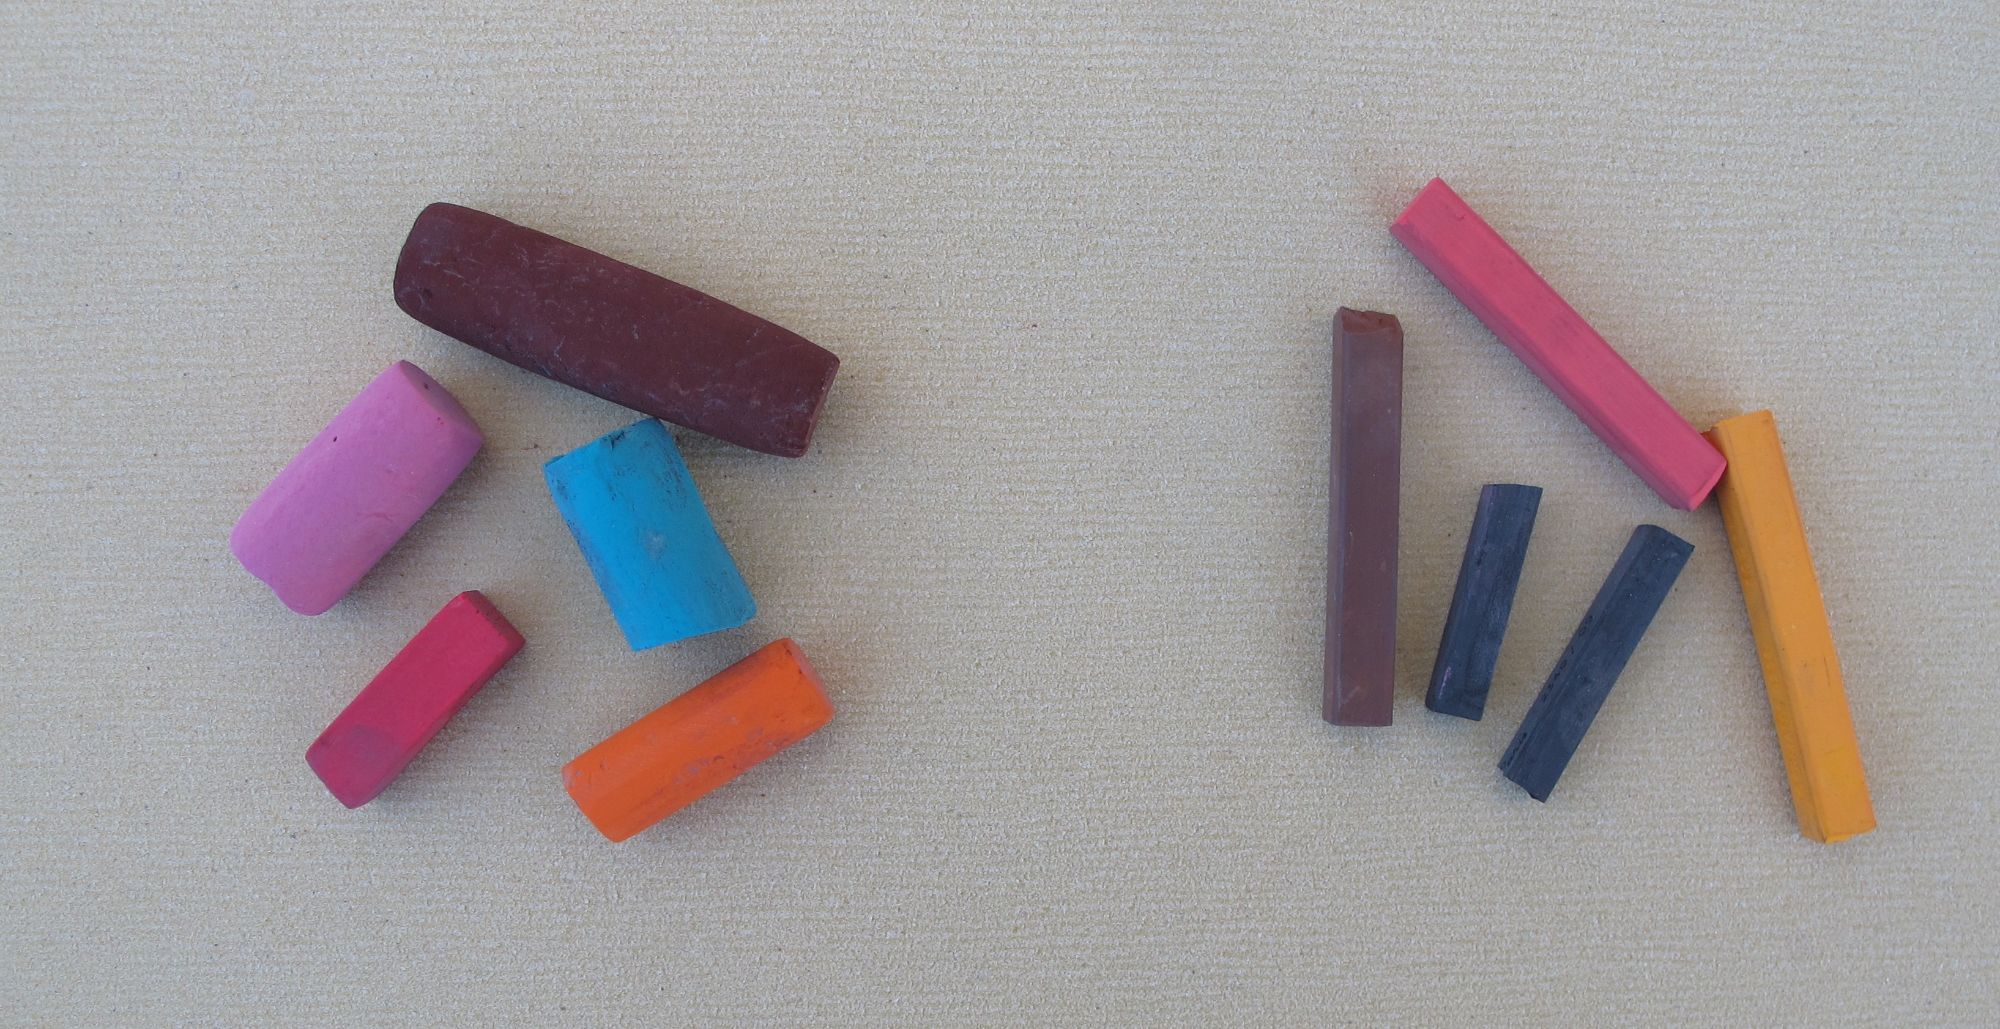
Pastels come in degrees of hardness. The picture above shows you soft pastels on the left and the harder type of pastel on the right. Although they are called soft and hard, they still come under the overall heading of 'soft' pastels
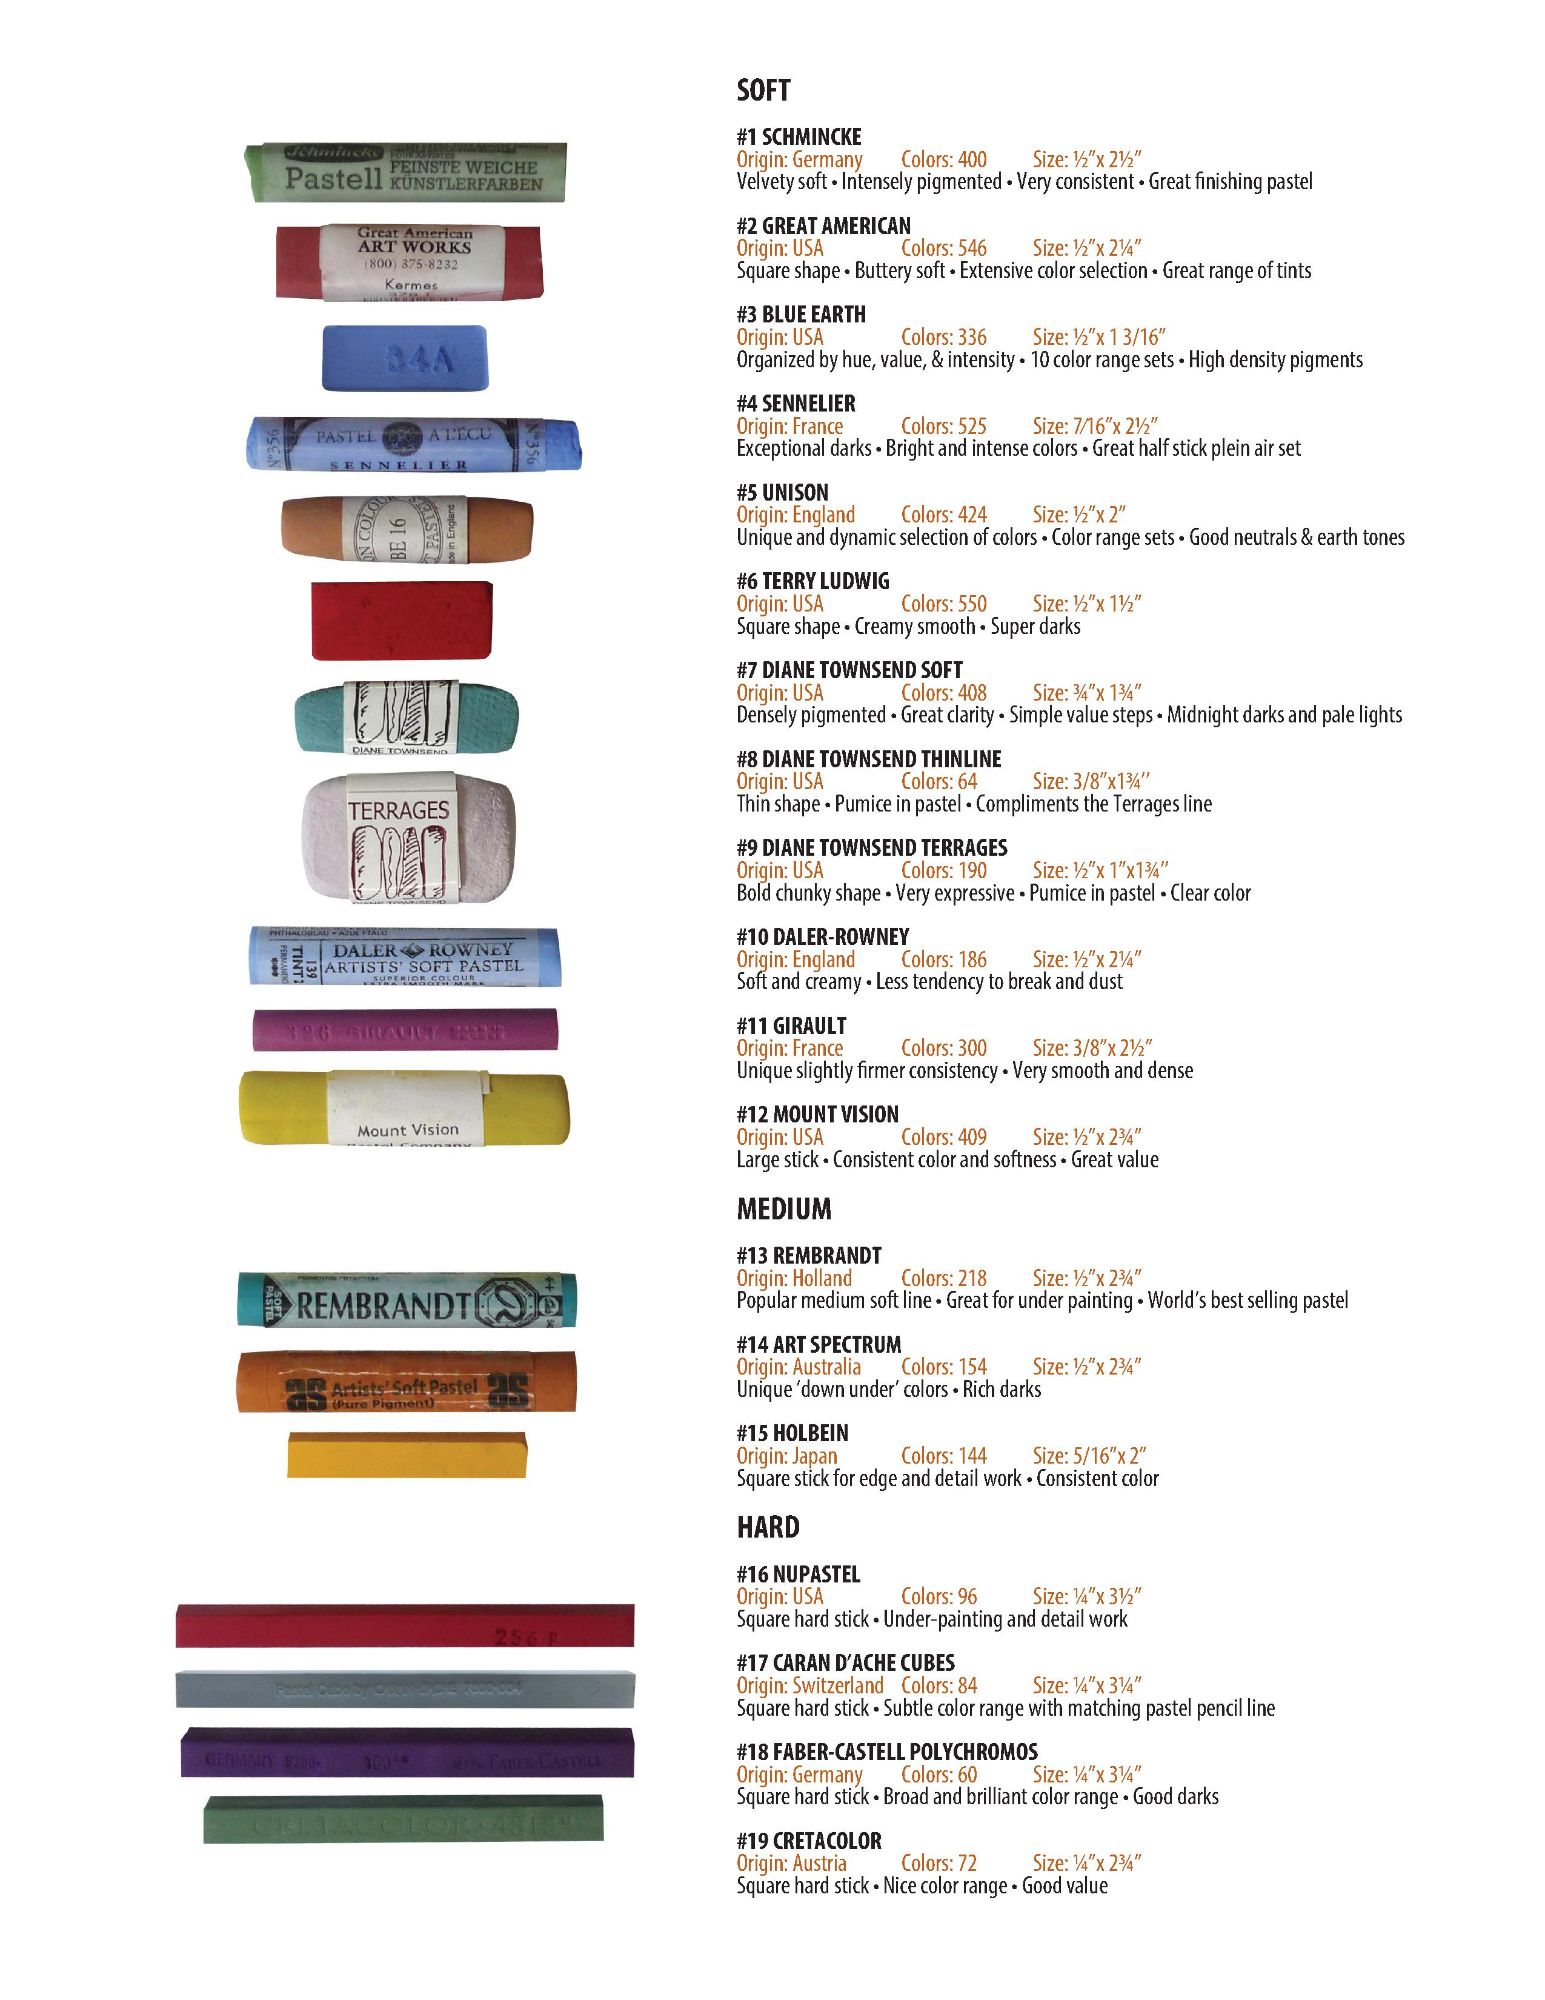
This is a chart produced by Dakota Art (www.dakotapastels.com). It shows you many brands of soft pastel listed in their degrees of softness/hardness - softest at the top of the list and hardest at the bottom.
I suggest you choose your softest pastels from the middle of the list and your harder pastels from the bottom. Although some artists disagree with the order of pastels on this list, it is however a very good guide.
Click the image to enlarge it
Although pastels can be laid one on top of the other to give a subtle change in colour, they cannot be easily mixed together to form different shades as with other painting mediums. If you rub them together too much in order to mix them, you lose the lovely sparkle that is given off from the tiny mineral crystals within the pastel. It is better to have just a few colours with many variations of tint rather than buying lots of rich bright colours, many of which you will rarely use unless you are a painter of flowers. You can purchase specific starter kits. I suggest you have a selection. Some soft, some semi-hard sticks and also some hard pastel sticks. It would be best to choose your soft and semi-hard pastels from the middle of the list and your harder pastels from the bottom of the list. The pastels at the top of the list are extremely soft and not as easy to manage when you are starting out. They crumble easily and fill up the 'tooth' of the paper very quickly, leaving you little to work with. I use a mixture of Unison (soft), also Rembrandt (semi-hard) and Faber Castel Polychromos (hard).
Work on a board and easel if possible. This enables excess pastel to drop off easily.
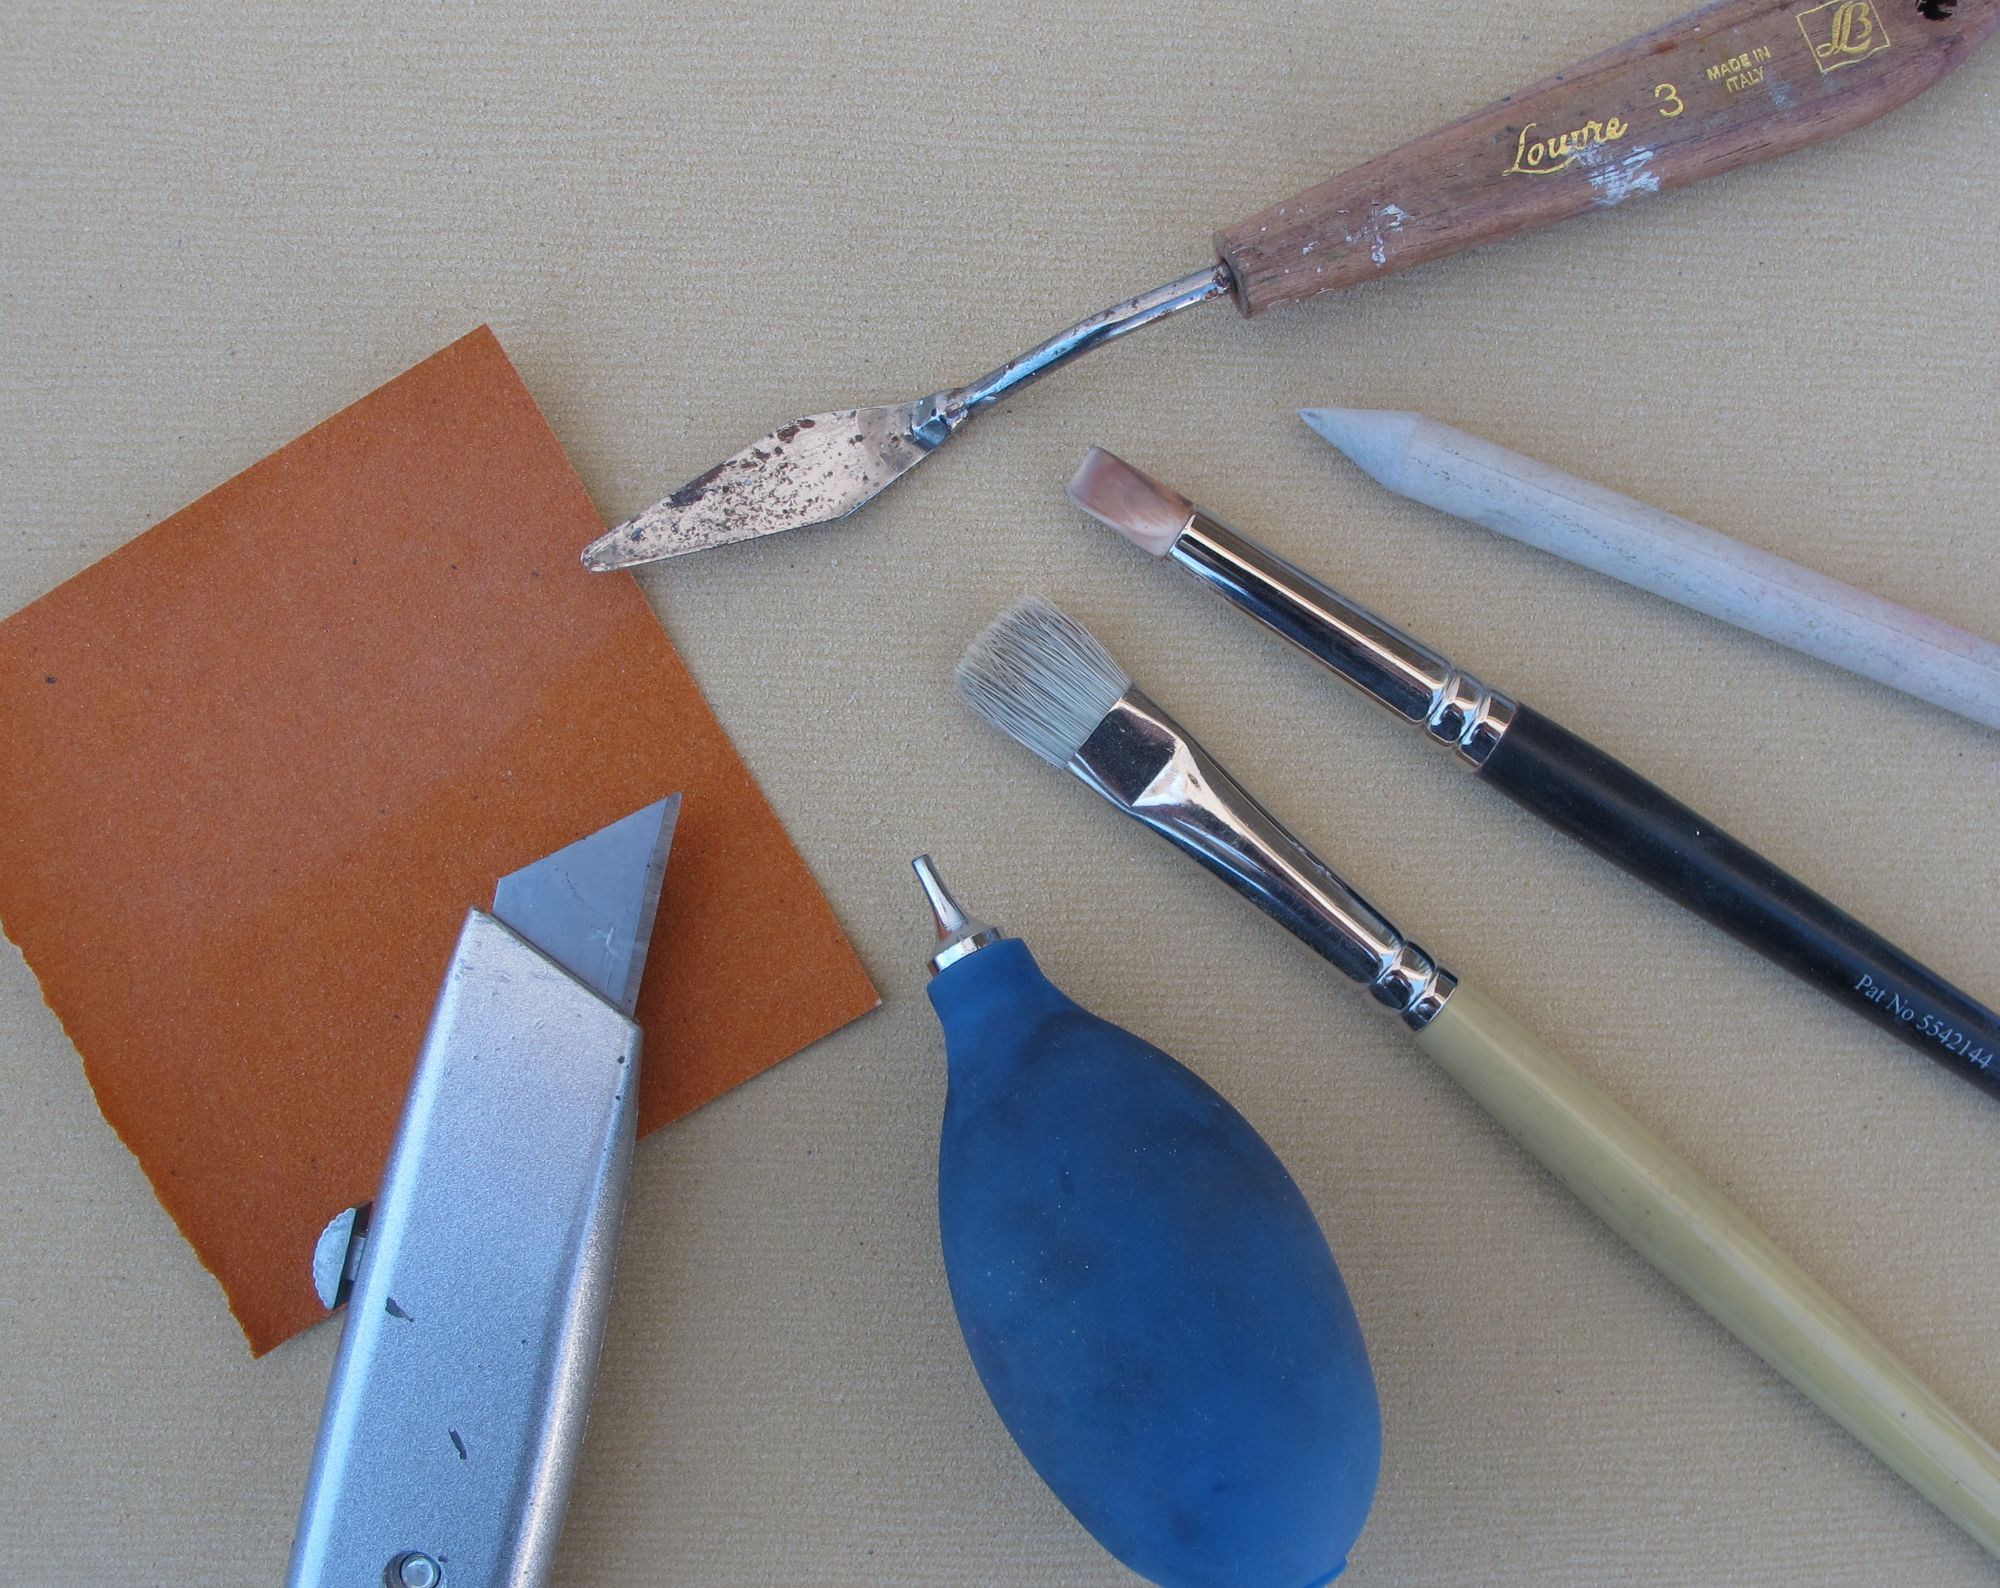
You will need a few additional tools when working with pastels. These are illustrated on the left.
- Sandpaper to sharpen the hard pastels
- A craft knife
- A little dust blower and a stiff dry brush for removing unwanted pastel from your paper
- A paper stump and a pastel blender (however, your fingers are the best blending tools!)
- A palette knife. Useful for pressing little flakes of pastel into the paper to suggest highlights
Pastel Papers:
Pastels require a ‘tooth’ on the surface to grip the pastel. Special pastel papers and boards vary from very smooth to very rough. The smoother papers, although usually cheaper, do not hold as many layers of pastel and can look rather dull as they need more blending. Very abrasive surfaces can give your pastels more richness but they can eat up the pastel very quickly. Therefore, when starting out with pastels, I suggest you use a paper that comes between these two types and choose a neutral shade to start with. Clairfontaine Pastelmat, although appearing smooth, will hold an enormous amount of pastel. A fine abrasive surface such as Canson Mi Tentes ‘Touch’ (or other sanded papers), will give you slightly more variations in texture but still allow you to paint fine details.
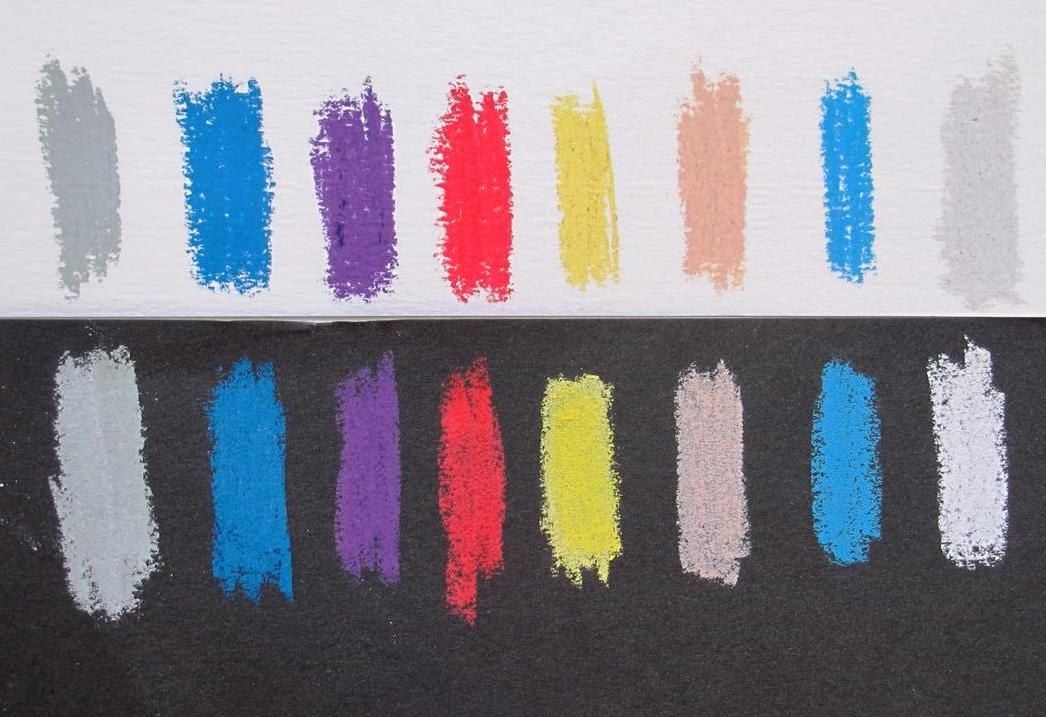
Most, but not all pastel papers come in various colours. I previously suggested that you start by using a neutral colour. By doing this, your pastel colours will remain true. What do I mean by this? If you look at the image above, you will see that I have put a piece of black paper and a piece of white paper next to each other and stroked different coloured pastels across both papers. The pale grey is almost impossible to see on the white paper but on the black paper it looks quite bright. Some of the colours look lighter, some darker and some look a completely different shade. This may not be quite so obvious on the screen, so you need to try this for yourself. You will be surprised at the results! Coloured papers therefore change the appearance of your pastels and this can become confusing when you first start using them. Later, when you have a little more experience, you could start experimenting with coloured papers. They can help to set the ‘mood’ of your painting, illustrated in the paintings below.

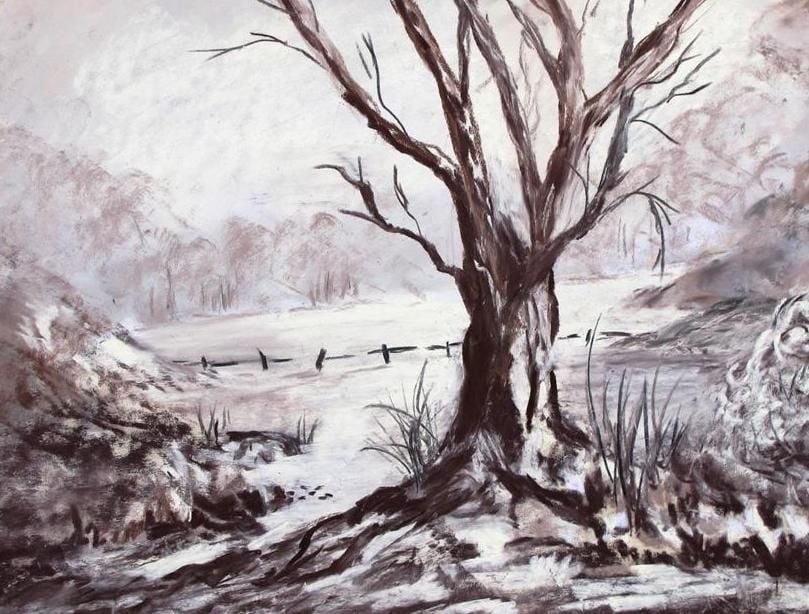
Here you can see two similar landscape pictures. One has been done with shades of grey pastel on white paper and the other with shades of brown on beige colour paper. Just by changing the colour or texture of the paper you can get very different results. When starting out with pastels, don’t be afraid to do lots of tonal studies like these. You will find it helps you to concentrate on managing the pastels and to get the effect of depth in your pictures.
Over blending pastels can make our work look flat and uninteresting. However, blending does have its uses; mainly for depicting distant objects, soft edges or backgrounds. A whole under painting could be done by using blended pastels, well pushed down into the paper. On some more robust papers, under paintings can be done with paint or ink; then, more textural pastel strokes can be laid over the top. Doing an under painting is just one method of working. Another method would be to work on each area of the painting separately using blending and textural strokes simultaneously. A third method is to put in your lightest lights and darkest darks before you begin, so you know that all the other tones in the picture will have to fall between these two. You can work from light to dark or from dark to light. Therefore, you can see that there is no one method of using pastels, it’s whatever pleases you. Experiment with them all to find the method or methods you prefer.
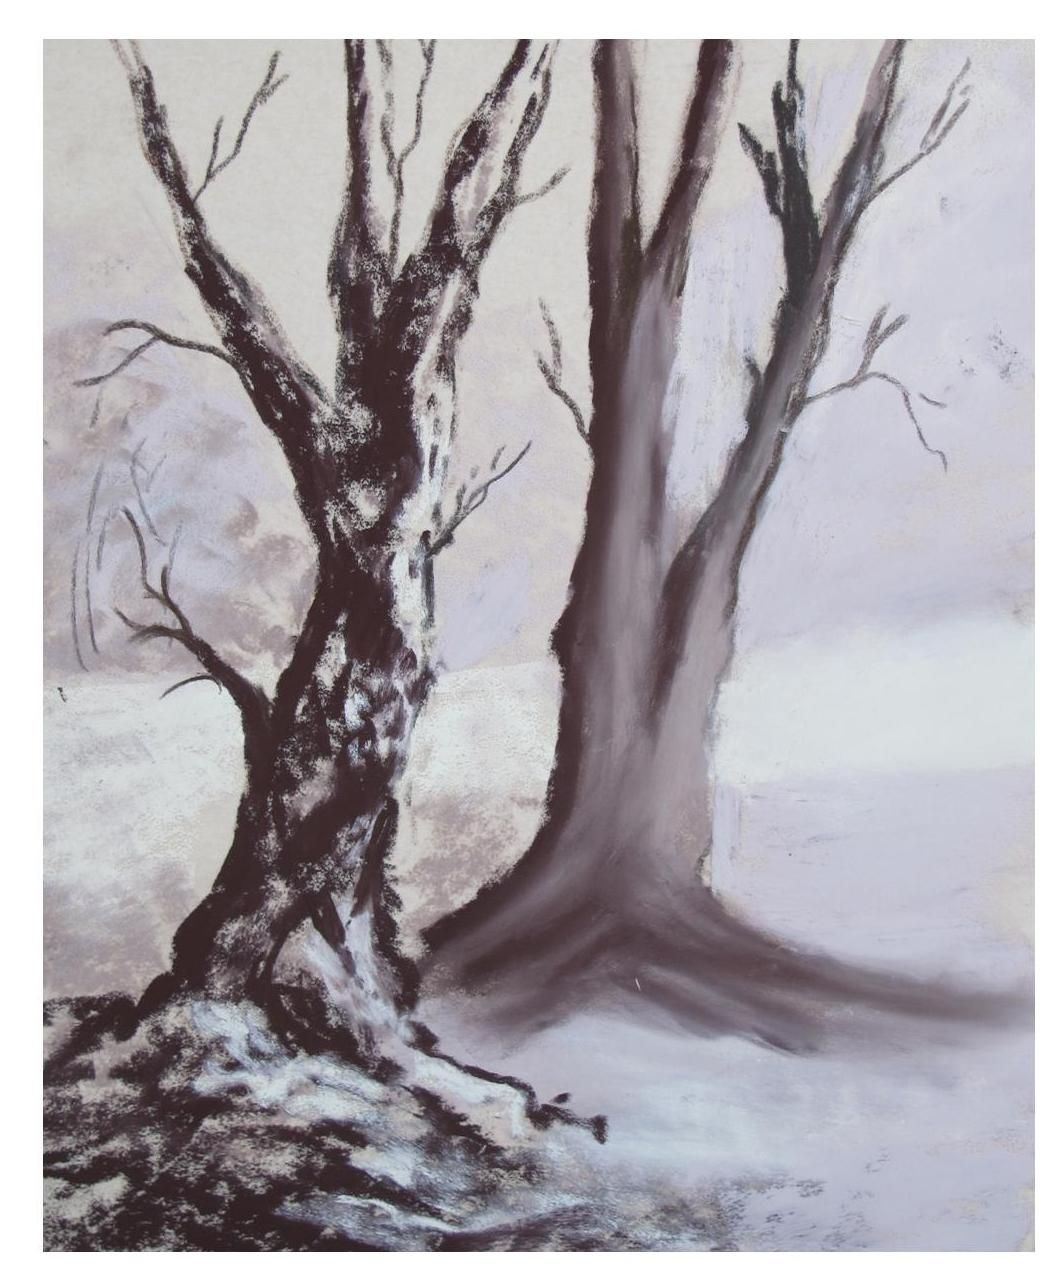
Look at the two trees in this picture. The tree on the left has plenty of texture but no blending. The tree on the right has been heavily blended. What a difference! A picture that is all blended looks very flat. Keep your blending for backgrounds, soft edges and distance. The more texture you require the rougher the paper should be. I prefer Clairefontaine Pastelmat for detail and Canson Mi-Teintes ‘Touch,’ for more textural paintings.
Pastel is a wonderful medium, so forgiving and versatile. Yes, pastels are messy, but you only have to keep a damp cloth with you whilst working and wash your hands well at the end. I always paint with a damp cloth in an old plastic box on the table and a small towel over my shoulder so I can constantly clean my hands. If you are about to buy new pastels, I would recommend not getting ones that are extremely soft until you get used to them. A medium hard pastel is easier to handle. I nearly always use a mixture of Unison,also Rembrandt and Faber Castell Polychromos.
For a book on starting pastels, go to my book page
I really hope you have found this very brief introduction to pastels useful. Enjoy your painting