Starting to draw - Part 1.
Posted on
Starting to draw. Choose your materials
Part 1. Graphite pencils
by Anne Kerr
"I can't draw", is something I hear time and time again. However, if you can hold a pencil you can draw. Sometimes, when people decide to start drawing, they make the mistake of trying to include too much in their picture. They go out looking for the perfect view and try to include absolutely everything they can see. If they are indoors, they often try to draw an entire room with all its contents. These would be truly daunting tasks for any artist. When you start to draw, keep it simple. If you look around you at this very minute, there are a host of subjects that would make wonderful little drawings. A lamp, a chair, a bowl of fruit or a pretty window. Drawing is all about light and shade. Get the shading right and your pictures will instantly take on a three dimensional look. When starting out, keep away from figure drawing, portraits, and over complicated architecture. There will be plenty of time for these later. If we get a nose on a face a centimetre too far to the left it will look very strange. If we get a tree a centimetre too far to the left, nobody will ever know!
This series of six blogs on drawing will introduce you to various drawing materials. Graphite pencil, water soluble graphite with coloured pencils, ink pens and line and wash. I will show you how to shade and build your picture using simple progressive steps. The final article will include a project for you to tackle using some of the materials and techniques covered in the series. Different drawing mediums can give quite different results so you can choose whether to use one particular drawing medium or mix them up when you tackle your final project.
Let's start with graphite pencils, as these are the tools with which most people are familiar. You don't need a huge collection; just four pencils will do to start with. The higher the reference number on the pencil the softer and darker the line it can produce.
Materials you will need (see figure 2.)
Graphite sketching pencils - HB, 2B, 6B, 9B
Craft knife
Good quality sketching paper or sketch pad. Minimum weight 150 gsm
Soft rubber
Battery operated rubber, for removing highlights (optional)
Figure 2
Let's draw
Here are four tips to get you started.
Tip 1. Begin with fairly light lines using your HB pencil
Tip 2. Try to do as much drawing as you can without using your rubber. It will give you confidence and stop you fiddling! Keep your lines quite uneven and even broken in places. A continuous hard line is rather boring. Broken lines give your work movement and interest. Sometimes you only need to suggest the texture of a surface or an object for your viewer to know what it is. You don't need to draw every tile on the roof or every brick in the wall. (Figure 3)
Figure 3.
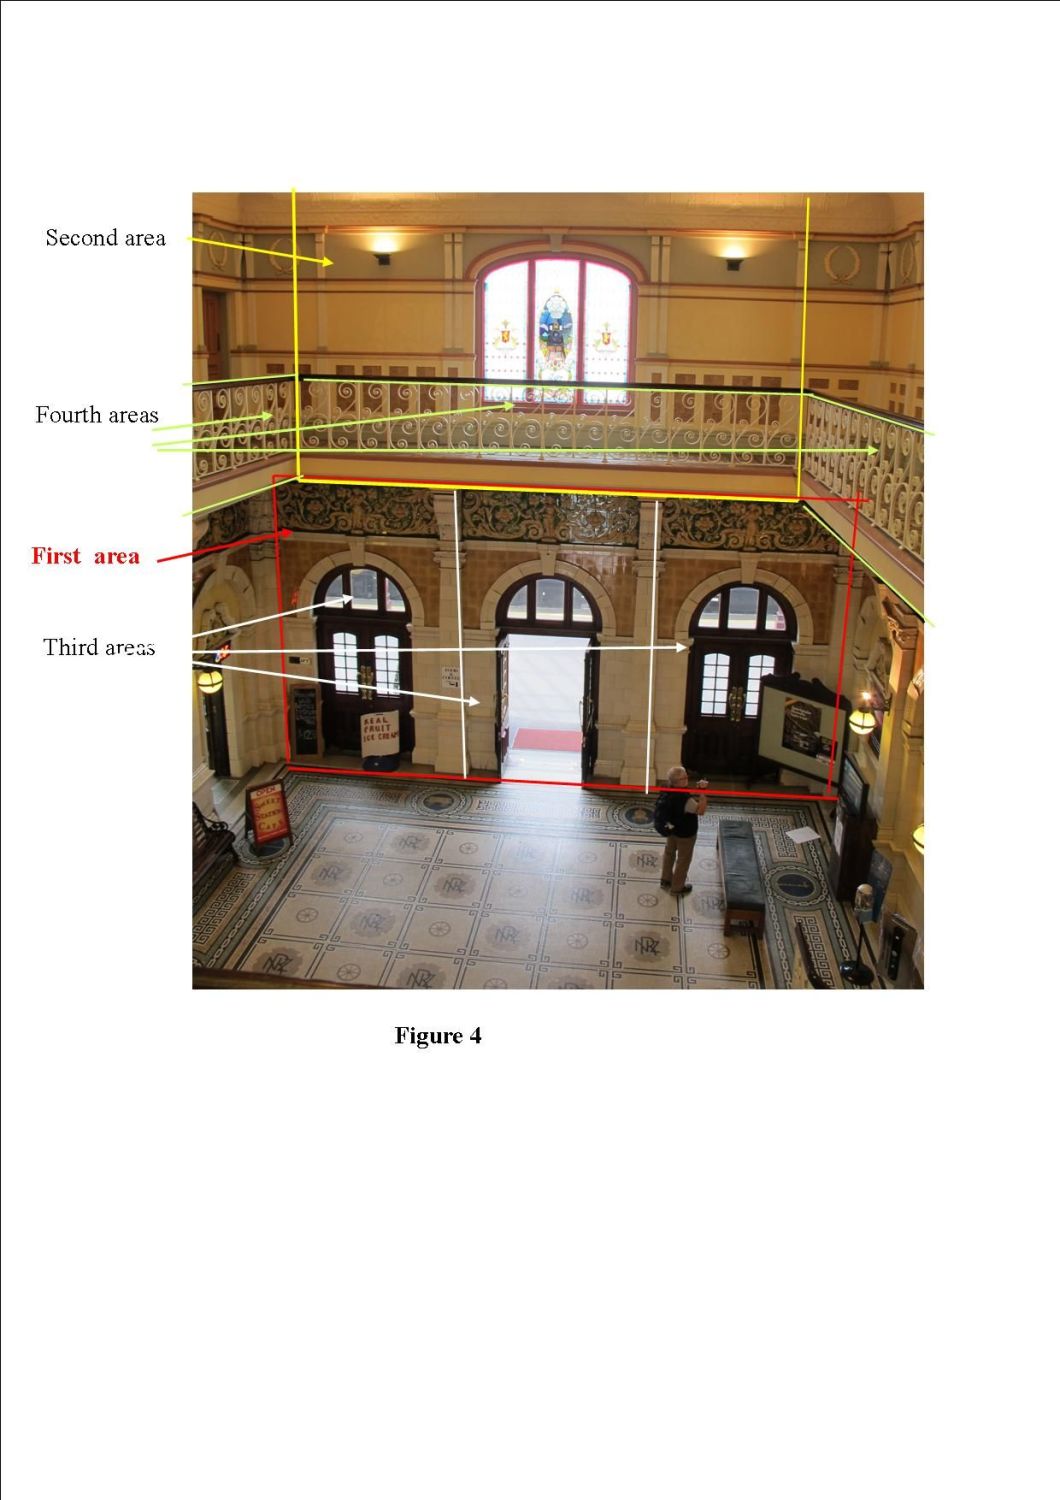
Tip 3. When starting a drawing, look for overall shapes within your subject. Draw the biggest shape first, then the next biggest and work inwards from there. This is called "drawing from the outside in". It is so easy to get caught up in fine detail, only to find that we have run out of paper, or the drawing sits awkwardly on the page making the work look unbalanced. Look at the photograph in figure 4. I have drawn coloured lines around the shapes you would start with. The largest shape is the red box; the second largest is the yellow box and so on. Putting in the detail will come right at the very end as you gradually work your way from larger to smaller.

Tip 4. Once you have the outline drawing, decide on the direction of your light source and shade your picture accordingly. Don't be afraid to put an arrow to the side of your work to remind yourself of the direction of light.
When shading a drawing, hatching and cross hatching are often used, (see figure 5).
Figure 5.
Although these shading techniques have their place, try not to use them exclusively. They can make your drawing look rather flat and mechanical. Figure 6 shows you a few different shading marks that can be used to depict various textures and surfaces
This is not an exclusive list but will be enough to use for the time being. I have left one square blank. Perhaps you could think up a shading technique of your own?
Figure 6.
A shading method that follows the contours of either the textured surface or the overall shape, gives a more realistic effect. Look at the tree stump and metal post in figure 7. In the tree stump I have followed the texture of the bark. In the post I have followed the object's rounded contour. You will notice that the shaded lines on the post bend in different directions above and below eye level. This all helps to show shape and form. The tree is obviously rough and the post smooth.
Two drawing exercises
Look around you and choose a simple subject. Follow tips 1 - 4 and have a go.
I chose the corner of a coffee table and a plant pot with some curtains in the background. (figure 7a). Notice how the darkest values are on the objects in the foreground.
Now choose another item and draw it without ever taking your pencil off the paper! This will give you a loose scribble drawing but is a great exercise in not using the rubber or fiddling with detail.
Tip
Keep a sketch pad and pencils near your favourite chair. Draw one object every day trying to use different shading techniques. Look back at figure 6 for reference.
Moving outside. How can we show shading on foliage and outdoor structures?
One of the most useful shading techniques for depicting trees and bushes is the one I call 'dot, dash scribble'
This is how it is done
Sharpen your 2B pencil with your knife and, holding it quite loosely, make a series of squiggles, swirls, dots and dashes. The more you go over your work the darker and more shaded it will look. Make sure you leave some white bits showing, as a completely filled in area will look dull and uninteresting. You can see this technique in figure 8. You can also use this technique for curly fur and curly hair. It is very effective and really easy.
Figure 8.
When showing light catching tree foliage use shading technique 6d. See Figure 9. This just suggests the shapes of the leaves (rounded or spiky) and we immediately know that the whole area is in sunshine. No need to draw every leaf!
Figure 9.
Stones, rocks and bricks can be shaded using 6e (dot stipple). This will suggest their rough texture.
Grass and other short foliage can be suggested with 6j (short and long strokes)
The thick and thin line pattern in 6b can be used for the fur patterns on animals, horizontal ripples in water or rough tree bark. The possibilities are endless. Just use your imagination but try if possible to follow the contours of the object you are shading.
Drawing from a photograph
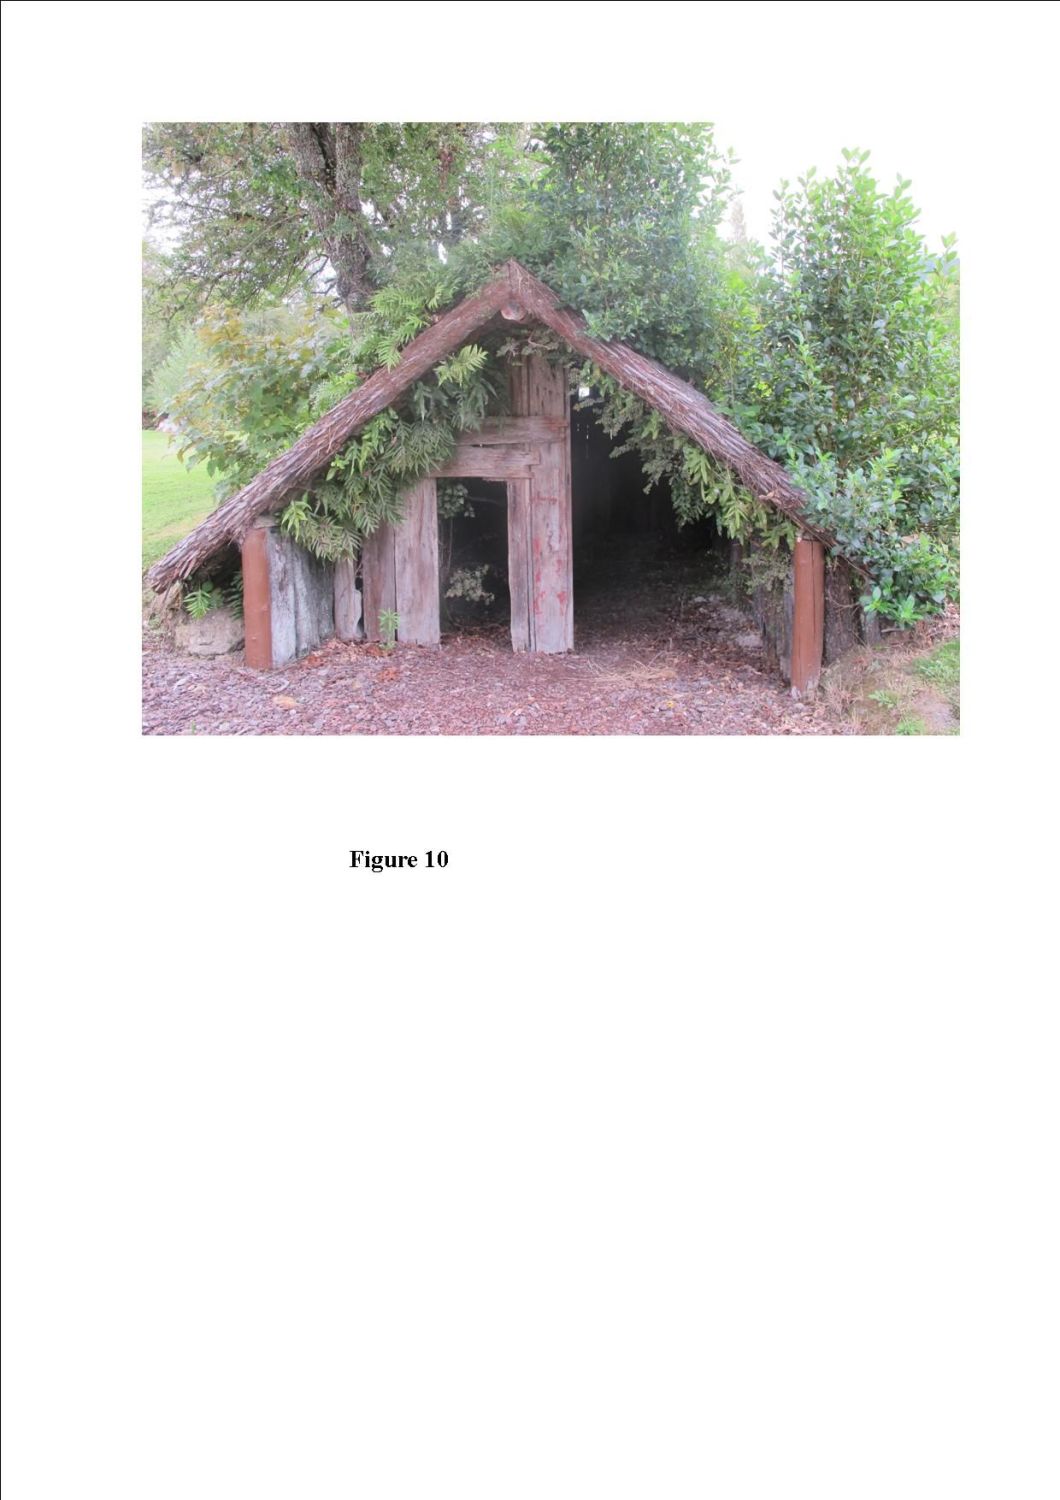
When visiting New Zealand, I took a photograph of a little Maori house (see figure 10). I have chosen this as a subject as there is scope to use many of the drawing and shading techniques I have covered in this article. Have a go at this picture and see how you get on. Remember to start your drawing with an outline of the largest shapes and work inwards. Next time I will show you my finished drawing with the sketching and shading techniques I chose.

