Picture Framing - the basics. Part 2
Posted on
Picture Framing - by Anne Kerr
Part 2: Cutting the picture mount (mat) and the glass
Originally, the main purpose of the mount was to keep the art work away from the glass. Mounts with bevelled edges were introduced much later to enhance the effect of the cut-out window. In Part 1. we saw how invaluable a good mount cutting machine is to the framer's workshop. The first mechanical mount cutters were introduced around the turn of the century. Modern mount cutters are highly accurate in setting mount border sizes and various shapes of mount are now possible. See figure 1. Once the mount has been cut, framers can use their imagination to decorate the mounts using inks, paints embossing etc. Mount decoration can be a complete art form in itself.
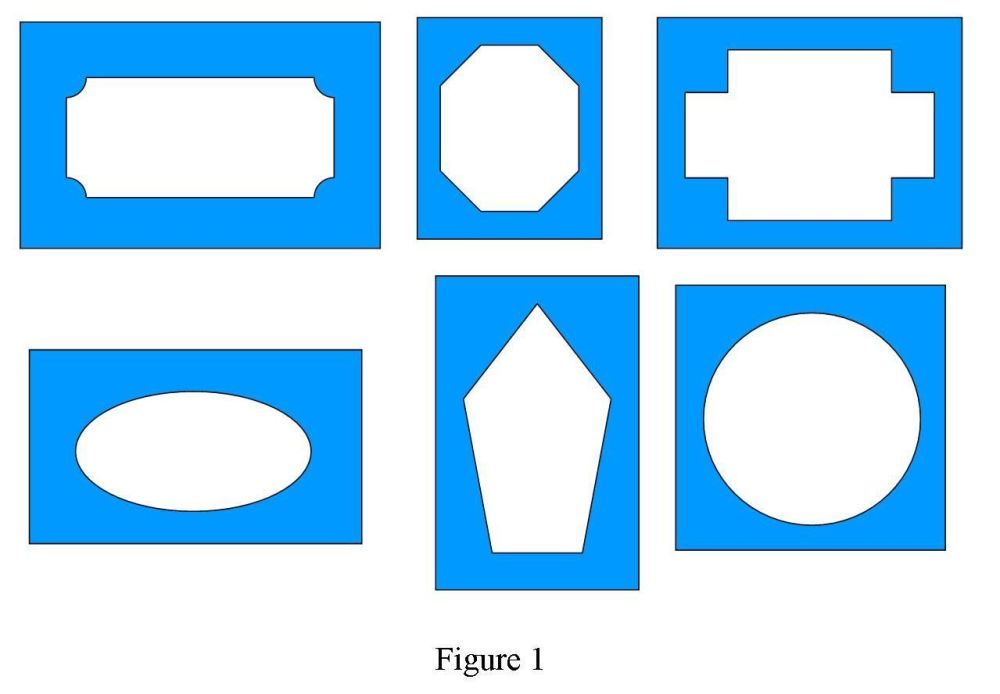
For the purpose of this introduction to picture framing, we will look at cutting a simple single mount, then look at how we can cut a double mount using a few added techniques.
Planning and marking out a mount
I have always used the Logan Simplex Elite , cutter and found this more than adequate for my need. First of all, decide on the type of mountboard you want to use. There are many different types and colours on the market. The most important thing to remember when choosing materials for framing is that any material directly touching the artwork should be pH neutral. This means it has been treated to reduce the acid content to an acceptable level. If you have ever looked at old framed prints, you may have noticed little brown spots called 'foxing' appearing on the surface. The cause of these spots is not conclusive but is thought to be aggravated by the picture touching materials that contain a fairly high level of acid. Always use materials that have a pH neutral label.
Neutral colours of mountboard are the most popular, so these are the colours I suggest you start with. Mountboard is sold in very large sheets (approx.40" x 32") and in different thicknesses. The best thickness of board for mount cutting is 1.4mm. When deciding how big to cut the piece of mountboard, several things have to be taken into consideration.
The size of the aperture or window in your mount needs to be slightly smaller than your picture, otherwise the picture will drop through the hole! You also need to remember that a little of the mount will be hidden under the lip (rebate) of the outer picture frame. Figure 3 will show you this in detail.
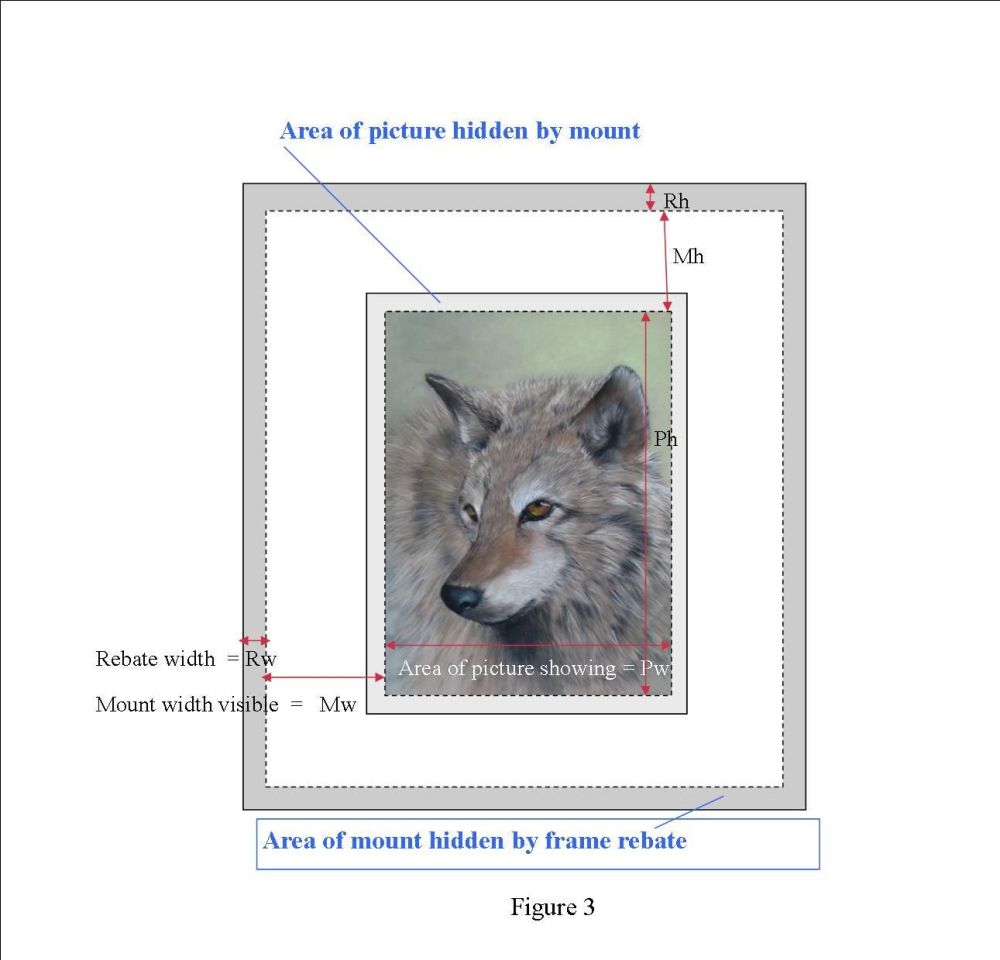
By looking at figure 3, you will now be able to calculate the exact size of the piece of mountboard you need to cut using the following formula:
|
|
Reference |
Width |
Reference |
Height |
|
Image size |
Pw |
|
Ph |
|
|
Add mount |
Mw |
|
Mh |
|
|
Add mount |
Mw |
|
Mh |
|
|
Add rebate |
Rw |
|
Rh |
|
|
Add rebate |
Rw |
|
Rh |
|
|
Total size for mount, glass and backboard |
Width |
|
Height |
|
This is a very simple little formula which prevents you from making mistakes when you come to the actual cutting process.
If you already have a frame, it's a good idea to take a couple of millimetres off both the final width and final height measurements so that everything fits easily into the frame. Atmospheric conditions can cause materials to expand and contract. If everything fits too tightly into the frame, the mount may buckle and the glass could crack.
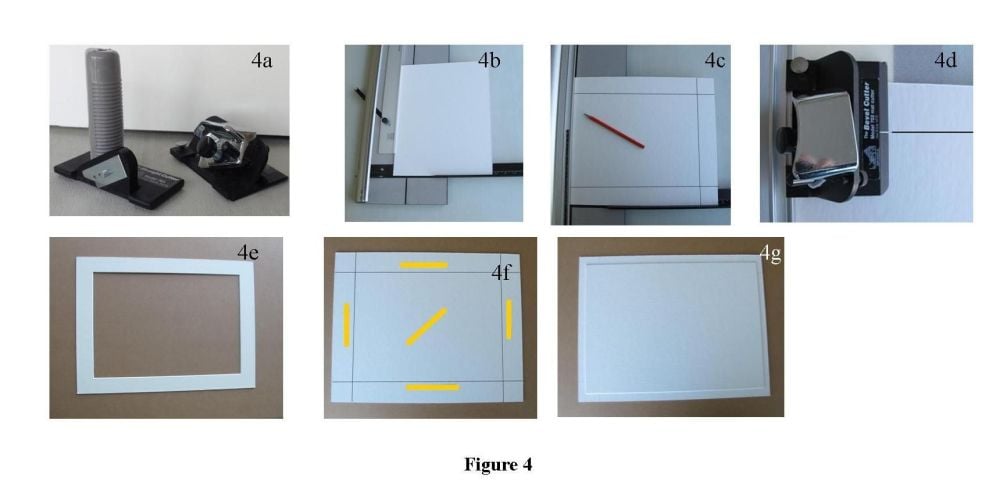
You now know the exact width and height for your mount, glass and backboard. Now check that there are sharp blades in your straight and bevel cutters (figure 4a), also check that your working table is clean and you have a very sharp pencil to hand.
Unscrew and slide off the mount cutter's removable measuring bar so that you can lay your chosen sheet of mountboard flat on the cutter's baseboard. Using your straight cutter, cut a piece according to your above calculations.
Now replace the measuring arm and fix it at your chosen mount width (Mw + Rw on the chart). Place your piece of cut mountboard face down with the left edge against the measuring arm and the bottom edge against the squaring arm (figure 4b). Lower the guide rail and run your pencil down the edge of the rail. Lift the rail and turn your board through 90 degrees, lower the rail and mark the board as before. Do this on all four sides. (Figure 4c)
Put a spare strip of mountboard under the piece you have just marked up. When you come to use your bevel cutter, if you have not put this strip of board underneath, the bevel cutter will make a nasty scratch all down the baseboard of the mount cutter (don't ask me how I know this!)
Cutting your mount
Hook your bevel cutter onto the channel of the guide rail. Line up the little white line on your cutter with the top pencil line on your mountboard (Figure 4d).
Some bevel cutters have a little silver thumb button that you can depress while you push the blade down into the mountboard. When your blade is fully engaged, maintaining constant pressure, slide the cutter towards you and stop when the white marker reaches the second pencil line.
Disengage the cutter by pulling the blade upwards
Turn your board clockwise through 90 degrees and repeat the process until all four sides have been cut. Lift your mount and the centre window should drop out. If it does not, then carefully slide a spare cutter blade in to finish the cuts. Poor or inaccurate cuts are usually a sign that the blade in your cutter needs changing.
You should now have a mount that has perfect bevelled edges and fits your picture exactly.(figure 4e)
How to cut a double mount
This may seem a difficult thing to do but it is actually very simple
First cut a single mount exactly as described above.
Check that the centre window drops out, then lay your mount face down on a clean table. Replace the centre window piece
Put a small strip of double sided tape on each side, also a piece on the centre window (Figure 4f).
Find a piece of board the colour you have chosen for the inner mount. This piece needs to be slightly smaller than the outer mount. Remove the protective cover on the strips of double sided tape and stick the inner mountboard face down onto the tapes.(figure 4g)
Take your mountboard over to the cutter. Adjust the removable measuring arm 5-8mm to the left.
Lower the guide rail and run your pencil down the board as you did before. Do this on all four sides.
Remember to put a spare strip of mountboard underneath the one you are about to cut or your cutter's baseboard will be damaged. Attach your bevel cutter and proceed to cut your double mount just as you cut the single mount. Because your inner mountboard is slightly smaller than the outer one, you will always be using the edges of the outer board as your cutting guide. Your inner mount edges will therefore always be parallel to the outer ones.
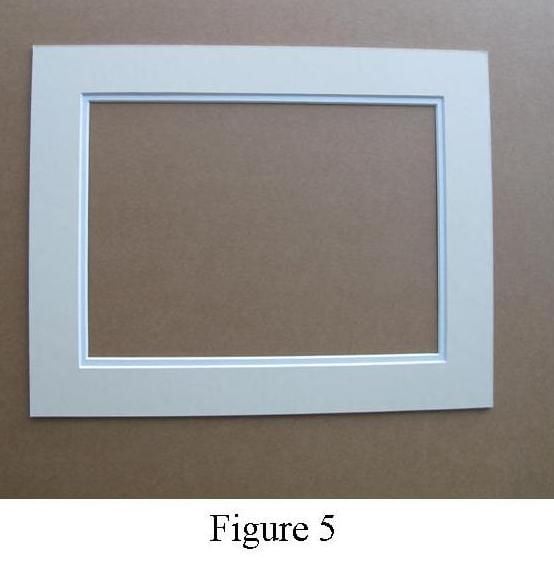
You should now have a perfect double mount (figure 5)
Cutting glass
You will need a cutting mat, a sharp pencil, fine pen or glass marker, ruler with a guide channel (buy on Amazon) , glass cutter, sheet of 2mm float glass, gloves (a pair of lightweight gardening gloves are ideal)
Place your glass on the cutting mat making sure it is absolutely square (Figure 6a)

Mark your glass on top and bottom edges. We have already mentioned that your glass needs to be slightly smaller than the frame.
Line up the marks against the ruler and draw a line.
Because of the width of the glass cutter's edge, the ruler will need to be placed about 2mm inside the line to be scored. (figure 6b)
Hook the glass cutter onto the guide channel.(figure 6c)
Starting from the top, feel the glass cutter on the edge of the glass. Apply firm even pressure and pull the glass cutter towards you with ONE clean score line. Don't go back over it as this will damage the cutter. If you have doubts, turn the glass over and score the other side.
Slide the sheet of glass to the edge of the bench and snap the two pieces apart by holding thumbs and fingers either side of the score (as if you were breaking a bar of chocolate)
Turn the glass through 90 degrees and cut the other side in exactly the same way.
You now have all the information you need to either cut mounts and glass for old frames or fit out a newly purchased frame to your own requirements.
In Part 3 we will look at making bespoke frames from our chosen picture moulding.
